Installing iTools
iTools extends and enhances Apple's built-in web server with an updated version of the Apache web server, a caching-proxy service, an enhanced FTP server, a point and click browser-based configuration service, and other features. Once installed, the "Web Server", "FTP Server", and "Mail Server" settings in the "Services" tab under the OS X Server network control panel control the updated iTools applications.
Pre-Installation
The iTools family of Mac OS X Server networking applications requires a properly set-up network configuration. Each Mac OS X system must be pre-configured with a hostname, an IP address, a domain name, and an IP address for a Domain Name Server. If you are unfamiliar with these terms, please contact your system administrator.
Use Mac OS X Server's "Network Configuration Manager" to set a hostname, a domain name, and an IP address. If necessary, consult with your network administrator and the Mac OS X Documentation for more information.
In order to prepare the OS X Server correctly so that iTools will configure itself when it is first run, you should open up the "Network" control panel in OS X Server. You can do this by clicking on the Apple menu and selecting "Computer Settings", and then selecting "Network". Click on the "Connections" tab and enter your IP address and the host name. A hostname on a web server machine is usually "www", but can be any DNS registered name such as "fred". Click on the DNS tab next and enter your domain name in the "Search Domains" field. It is necessary that you enter a domain name for iTools to work properly. A domain looks like "tenon.com" or "apple.com". Next, click on the "Services" tab and make sure that the Server Name is properly synthesized from your host and domain name. It should look like this: "hostname.domainname". For example, "fred.tenon.com".
If you have previously installed iTools, this release will preserve and incorporate the existing configuration files, including the following (paths relative to /Local/Library/WebServer):
Even though the package installer preserves an existing configuration, it is always a good idea to back up important files such as those listed above in case something goes wrong. If you are currently using Apple's built-in Apache web server, you may want to preserve your apache.conf file located in /Local/Library/WebServer/Configuration, and any additional Apache modules you may have added. The Apache modules can be found in /System/Library/Apache/Modules.
UFS and HFS
With OS X Server, Apple provides an advanced Unix file system called UFS. This filesystem is not compatible with HFS and HFS+ which were used with previous Mac OS versions. OS X Server installs the "Blue Box" by default which contains a Macintosh File system for use with the version of Mac OS that runs under OS X Server. Though web-based content can be stored in the HFS, HFS does not provide all of the performance and flexibility that can be taken advantage of by storing web-based content on the UFS. For example, HFS limits file names to 32 characters, and does not support Unix symbolic links. This can come at a serious disadvantage when flexible file names or placement are needed. We recommend storing web content on the UFS, and using the HFS to store web-based content when absolutely necessary.
Installation
If the installation is from a download, then the package file must be copied to a directory on a local disk and then unpacked. If the installation is from a CD-ROM, the installation can take place from the CD itself. You must be logged in as the root or Administrator user in order to install iTools.
Installing from the iTools CD
The iTools CD contents shows where to find the iTools.mpkg package. The individual packages are found in the iTools.packages directory. Installation from the CD can take place directly from the CD. To install iTools components, double-click on the iTools.mpkg file or on each desired individual package (named with the .pkg suffix) and the Installer application will launch.
Figure 1: The iTools CD contents
Skip to section See The Package Installer once the Installer application has launched.
Installing from Downloaded Packages
Once you have downloaded the iTools distribution, change the current working directory to the directory that contains the iTools archive that was downloaded. Then, use the following command to unpack the distribution:
# tar zxvf iTools-5.*pkg.tar.gz
This command will extract the archive, and will create a file used by the Mac OS X server package Installer to complete the iTools installation. If you have downloaded the individual packages, then you will need to unpack each one with the same command, but with the individual archive names as the second arguments to the tar command.
Once everything has been unpacked, the iTools.mpkg or individual packages will appear in the working directory. The files with the .mpkg or .pkg suffix are what are used by the Installer. To install one of these files, double-click on it's icon in the Workspace Manager and the file will open in the Installer application. Before installing components one-at-a-time, make sure the core iTools component has been installed as it is a necessary pre-requisite for any constituent component.
The Package Installer
The Installer has a graphical user interface for use from the Workspace Manager. Remote or network-based installation can be accomplished using a command line version of the Installer which is described in section See Network Installation.
When installing from the iTools.mpkg file, the Installer will show a number of items that can be installed (see See Selecting the iTools Packages). Check off the packages that you wish to be installed. The first installation of iTools always requires the iTools core package (the first in the list) to be installed.
Figure 2: Selecting the iTools Packages
Package descriptions and suggested URL references to verify correct installation are available in the description section for each package. These URLs are simply meant as a quick check for correctness and are by no means an exhaustive checkout of the module. This information is included in this document in section See iTools Extensions.
Choose "Install" to begin the installation.
The iTools package installer creates the following files and directories. Subdirectories are not shown here but can be found in the package installer's log files.
/Local/Library/WebServer/WebSites
/Local/Library/WebServer/tenon
/Local/Applications/iTools.app/
/usr/local/squid -> /Local/Library/WebServer/tenon/squid
 The directory
/Local/Library/WebServer/WebSites will be the home for all new virtual host content. Any pre-existing virtual host information is stored in the /Local/Library/WebServer/Documents directory.
The directory
/Local/Library/WebServer/WebSites will be the home for all new virtual host content. Any pre-existing virtual host information is stored in the /Local/Library/WebServer/Documents directory.
Other files and directories may be installed depending on which iTools package has been installed.
Network Installation
iTools can be installed remotely using the iTools-installer.sh provided on the iTools CD in the "Utilities" directory. This is a specially modified script approximation of the Installer application and is similar to the /usr/bin/installer.sh utility installed with Mac OS X Server. Use this script to install iTools remotely. The iTools-installer.sh script will also be located in /usr/bin after the first iTools installation. Note that the iTools-installer only installs a single package at a time. iTools-installer parameters include `--help' to display a set of options, `--install' to install a package, `--delete' to uninstall a package and `--verify' to verify that a package is correctly installed.
Post-Installation
The iTools components are mainly installed into the /Local/Library/WebServer directory. In this folder, iTools installs:
- The "tenon" directory which contains the configuration files necessary for and specific to iTools.
- The WebSites directory which will contain the content for all virtual hosts. This directory replaces the default "Documents" directory installed by Mac OS X Server as the home for all virtual host content.
- The iTools documentation in the Documentation directory
After iTools is successfully installed, it is necessary to set the iTools license number and to set a personal Administration password to use when remotely administering the iTools system.
Launching the iTools Application
iTools includes a Mac OS X Server application designed to modify local administration username and password information, change the Tenon software licensing, start and stop the web and administration servers, and flush the cache. Use the Workspace Manager to launch the iTools application /Local/Applications/iTools.app. This application serves as the "front-end" application to the iTools servers. This application can be quit at any time. The iTools servers are not automatically stopped when the front end application is quit. The iTools front-end application can be restarted at any time. The iTools servers are not restarted if they are already running when the front-end application is launched.
For new installations, a web server administration account is automatically created when iTools is installed with username `admin' and password `admin'. Overlay installations (those that install over a previous iTools package) preserve existing web server accounts. As one of the first system operations, you should change default administration user name and password.
Change the Administrator Password
Pull down the "Admin" menu and select the "Set Admin Password" item. Enter the admin username and a new password for the iTools administration server. This username and password is used only by iTools. It need not exist in the system password database nor does iTools enter it into the system password database.
Setting the admin password is shown in the screenshot below:
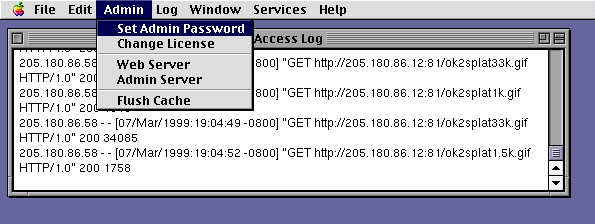
Set the Admin Password
Alternatively, the iTools Administrator password can be changed remotely via the Administration server. To do this, use a browser to connect to the local system. The default URL "http://hostname.domainname" should give you the content previously available from the Apple supplied web server. With the URL
http://hostname.domainname/itools_admin
you should get the iTools administration page. See chapter See Using the iTools Administration Server for Administration Server documentation. The initial username is 'admin' and the initial password is 'admin'. You are strongly advised to change these defaults. See section See Users for more information on changing the password of the Administration user.
Enter the iTools License
The iTools license number can be entered locally using the iTools.app or remotely. See section See Changing the iTools License number for instructions on changing the license locally. To enter the license number remotely, execute the /usr/sbin/chnglicense program, enter `y' to change the license, and enter your license at the prompt. The chnglicense program will output whether or not the license you entered is valid and if it is, how long the license will be valid.
iTools Daemons
iTools for Mac OS X Server contains updated versions of key protocol implementations: Apache 1.3.9, DNS (Bind 8.2), and FTPD (wu-FTPD 1.3.4(7)). The core iTools component installs these daemons. iTools also contains an updated Sendmail (Sendmail 8.9.3). The WEBmail component installs and activates this daemon. These are included to update, extend functionality, and to close one or more security holes that exist in the versions distributed by Apple. Bind 4.9.2 had a number of problems with the ability of outsiders to modify zone information without proper authority. Sendmail 8.9.1 had security problems in that internet spammers were able to forward mail through the server so that mail looked like it came from your host rather than the original spammer. Sendmail 8.9.3 closed this loophole. FTPD was updated to support virtual FTP hosts and to improve file access controls.
When iTools is installed, the DNS and FTPD Daemons are made active on your system. After WEBmail is installed, the Sendmail Daemon is made active on your system. If you do not need these Daemons running, you should turn them off as they waste system overhead. The paragraphs below show how each Daemon can be shut off if it is not needed.
DNS Daemon
If iTools finds evidence that the Domain Name Server (DNS) application - named - is running or configured, iTools will save any existing DNS configuration files in /Local/Library/WebServer/tenon/Backups/MACOSX-named.tgz. After preserving any existing named information and binary applications, the iTools installer updates the named software with BIND 8.2, creates named configuration information in a new /etc/named directory and installs a named start file in the /etc/startup directory. The /etc/hostconfig file is then modified to set DNSSERVER=-YES- so that named will be started automatically during system restart. If you do not plan to use the local machine as a DNS server, you should modify the DNSSERVER entry in the /etc/hostconfig file as DNSSERVER=-NO- and restart the system. This will save system overhead.
Sendmail Daemon
The Sendmail Daemon is not installed until the WEBmail iTools component is installed. When Sendmail is installed, previous Sendmail binaries and configuration are saved. The Sendmail backup data is stored in /Local/Library/WebServer/tenon/backups/MACOSX-Sendmail.tgz. Then the WEBmail installer updates the Sendmail software and startup information. Sendmail operation can be controlled by using the "APPLE->Computer Settings->Network" control panel and selecting the "Services" tab item. The Mail Server may be selected as ON or OFF to cause the Daemon to run or not at system restart.
FTP Daemon
The FTP Daemon is preserved and controlled in the same way the Sendmail Daemon is controlled. Any existing files are stored in /Local/Library/WebServer/tenon/backups/MACOSX-ftpd.tgz. Then the iTools installer updates the FTP Daemon software and startup information. The FTP Daemon startup can be controlled by the "APPLE->Computer Settings->Network" control panel and selection of the "Servers" tab item. The FTP Server may be selected as ON or OFF to cause the Daemon to run or not at system restart.
We urge you strongly to turn these Daemons off if they will not be used by your system. It saves processor and memory overhead as well as reduces the risk that any external forces can attack your system.
iTools Extensions
iTools includes separately install able packages that add functionality to the iTools web server. iTools extensions include ht://dig, a Sherlock-savvy search engine, and WEBmail, a hotmail-style mail server. Third-party packages include WebCatalog, a powerful eCommerce storefront, WebEvent, a calendar and appointment scheduler, WebCrossing, a conferencing application, HTML/OS a sophisticated tool for creating dynamic web pages, and FrontBase a powerful SQL92 compliant database . Open source packages include JServ, PHP, and MySQL.
 Once these packages are installed, you can browse the URLs listed below to find more information. Note that these URLs only exist if the particular package has been installed.
ht://Dig
For complete information on using ht://Dig, see chapter See ht://Dig.
This URL will give you a default set of indexing rules to make a searchable database of the local site. Run this index to create a searchable database:
http://hostname.domain/index.cgi
This URL will search the database for key words and phrases:
http://hostname.domain/search.shtml
WEBmail
For WEBmail documentation, see chapter See WEBmail.
With the WEBmail client at this URL, you should be able to use any browser to access POP mail from the local system and from remote server:
http://hostname.domainname/webmail
The iTools Administrator uses this URL to add local restricted users to the system database:
http://hostname.domainname/webmail_adduser
These user accounts will be permitted to receive local email but will not be allowed login (e.g. telnet or rlogin) access to the system. By default, one needs to have an iTools admin account to add new webmail users.
WebCatalog
Smith Micro's (www.smithmicro.com) WebCatalog is the premier eCommerce package for Mac OS X and Mac OS X Server. WebCatalog provides a turnkey storefront and WebMerchant supports online credit card validation. This package is a fully functional demonstration that only needs the purchase and input of a serial number to become a commercial released version.
This URL accesses the web page for the demonstration version of WebCatalog:
http://hostname.domain/webcatalog
http://hostname.domain/webcatalog/WebCatReference/Default.html
WebEvent
Matador's (www.matadordesign.com) WebEvent is one of the most sophisticated calendar and event scheduling applications under Mac OS X and Mac OS X Server. WebEvent supports text, graphic and video calendar operations
This URL accesses a demonstration copy of WebEvent:
http://hostname.domain/webevent . Browse this URL immediately after iTools installation to set up the WebEvent administrator account.
WebCrossing
Lundeen's (www.lundeen.com) WebCrossing is a powerful meeting and conference application for Mac OS X and Mac OS X Server.
This URL accesses the web page for the demo version of WebCrossing:
HTML/OS
Aestiva's (www.aestiva.com) HTML/OS is a powerful, high-speed, multi-user development environment for building advanced web sites on Mac OS X and Mac OS X Server. Use http://localhost/cgi-bin/htmlos-setup.cgi to complete setup. During setup, fill in "Domain Name:" with a fully qualified hostname <hostname>.<domainname> (e.g. goodhost.tenon.com).
This URL accesses the web page for the demo version of HTML/OS:
FrontBase
Frontline Solutions' (www.frontline-software.dk) FrontBase is a robust, feature rich, high-performance database for Mac OS X and Mac OS X Server. This is a network-ready, fully functional version with security checks disabled. FrontBase comes with a WebObjects EOF adaptor, a Perl interface, and a FileMaker-to-FrontBase Translation utility (FM2FB). Further details on these components and on the testing and verification of FrontBase can be found in the release notes.
JServ
Java Servlet Module for iTools under Mac OS X and Mac OS X Server. This module is used to create dynamic web content by executing web server-based Java Servlets and Java Scriptlets.
- This URL creates a dynamic web page indicating JServ status: http://hostname.domain/jserv/index.html
- To test Java Servlets, try http://hostname.domain/servlets/Hello.
- To test Java Script Pages try http://hostname.domain/jsp/snoop.jsp.
- To test embedded Java Servlets try http://hostname.domain/test.jhtml.
PHP3 and PHP4
PHP is a powerful and complete scripting language, with a rich set of database interfaces, for creating sophisticated dynamic web content. This package is a DSO (Dynamic Shared Object) Apache module with MySQL support for iTools under Mac OS X and Mac OS X Server.
PHP4
This is the latest beta PHP, version 4, a powerful scripting language that supports HTML-based tags to extend and enhance HTML. This package is a DSO (Dynamic Shared Object) Apache module with built-in MySQL database support for iTools under Mac OS X and Mac OS X Server. Use http://localhost/test.php to exercise this package.
If PHP4 is installed, use http://hostname.domain/test.php for the PHP4 version of the PHP test table.
MySQL
MySQL database for iTools under Mac OS X and Mac OS X Server. MySQL is a Structured Query Language (SQL) database popular under UNIX and widely used with PHP. See the release notes for information on testing and installation verification.
MySQL is not directly testable from a URL and must be tested from a series of command line requests. The MySQL release notes contain a set of command line requests that establish a small set of databases and then proceed to exercise the databases.