Adding SSL
iTools supports version 3.0 of the Secure Socket Layer (SSL) protocol to encrypt Web server transmissions. The secure socket layer intercepts network calls from the server to encrypt the data before forwarding it to the network layer for transmission to the browser.
The Web server and the browser negotiate an encryption algorithm, or cipher, to be used for the session. A session "key" is securely communicated to the browser using public key cryptography. The session key is then used symmetrically, i.e., to both encode and decode the actual session data.
The iTools download page and the iTools CD include an exportable SSL Installer. For US and Canada, contact Tenon's Sales Department (sales@tenon.com) for the domestic SSL Installer. The first step in setting up SSL is obtaining a Certificate.
Server Certificate
The server certificate validates the identity of the server. Server certificates are signed by a trusted higher authority (the Certificate Authority, or "CA"), who assures the identity of the server.
In a typical commercial virtual host setup, each IP virtual host will have a unique server certificate.
Named virtual hosts (hosts that share an IP address) must share the certificate of the common IP host. By default, iTools associates a certificate issued to an IP virtual host with all configured named virtual hosts that share that IP address.
Obtaining a Server Certificate
In order to obtain a server certificate, a Certificate Signing Request (CSR) must be sent to the Certificate Authority, along with other proof of identity documents.
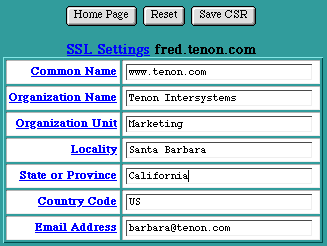
- Fill out the SSL Settings form (see section SSL Settings) within the iTools Administration Server.
- Submit the completed CSR to the Certificate Authority. Thawte Consulting (www.thawte.com) has an on-line CSR submission form at:
http://www.thawte.com/certs/server/request.html
- Copy and paste the CSR from the SSL Settings form into the CSR submission form.
- Some browsers do a poor job of copying the CSR from the SSL Settings form. To test this, copy the CSR and paste it into any empty text document of a text editor (such as BBEdit). If each line of the text is not left justified at the beginning of the line, use the text editor to cut any white space at the beginning of each line. Then copy this properly justified CSR and paste it into the CSR submission form. Other documents validating the identity of the server must be mailed to the CA, along with a nominal service fee. These documents include:
- Proof of the right to use the organization name, as in a copy of the company articles of incorporation, "doing business as" registration, etc.
- Proof of domain name registration (except for ".com").
- A letter, printed on organization letterhead and signed by an authorized representative, requesting certification of the domain name.
Your official certificate will be digitally signed and e-mailed to you by the CA. Rename the certificate to " xx.xx.xx.xx.crt " (where < xx.xx.xx.xx > is the IP address of the virtual host for which the certificate was generated), and place the official certificate in the WebServer/tenon/ssl/certs folder. The official certificate will replace the temporary self-signed certificate generated by iTools for use prior to receipt of the official certificate.
Each SSL Certificate works in conjunction with the SSL Key file located in / etc/ssl/private that was produced during the creation of the CSR. If the SSL Certificate file is lost, you may be able to request it again (at some expense) from the Certificate Authority. If the SSL Key file is lost, the SSL Certificate is useless and a new certificate will need to be issued. See section See Safeguarding SSL Keys and Certificates.
SSL Settings
To generate an SSL certificate, click on the Certificate button beside the SSLSecurity entry in the Virtual Host Configuration table. The SSL Settings page is a form for generating a Certificate Signing Request (CSR).

Common Name
The Common Name is the domain name of the Web server or of an IP-based virtual host. This must be a fully qualified domain name, not an IP address or a DNS alias.
Organizational Unit
The Organizational Unit is the department name or the name of a unit within an organization. This field is optional.
Locality
The Locality is the name of the city in which the organization resides. This field is optional.
State or Province
The State or Province is the name of the state or province in which the organization resides.
Country Code
 The Country Code is a two-character country code for the country in which the organization resides. If anything other than a valid country code is entered, a CSR will not be generated.
Email Address
The Email Address is the email address of a contact or representative within this organization.
Generating a CSR
To generate a Certificate Signing Request (CSR) save the SSL Settings via the Save CSR button. This action has several effects.
If a private key for this virtual host does not exist, such a key is created and saved in a secure area in iTools's internal file system. This SSL Key file is important and should be saved once a CSR is produced. See section See Safeguarding SSL Keys and Certificates.
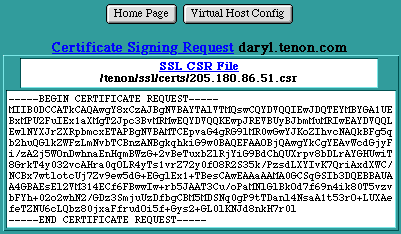
The actual Certificate Signing Request information is displayed in the iTools Administration Server. This CSR is a PEM-encoded document which may be e-mailed to the CA, or it can be copied and pasted into an on-line certificate request form. This CSR is also saved in the WebServer/tenon/ssl/certs folder in a file named xx.xx.xx.xx.csr (where < xx.xx.xx.xx > is the IP address of the virtual host for which the CSR was generated).

Certificate Signing Request Information
A temporary, self-signed certificate (for use while your CSR is being processed by the certificate authority) is created and saved in the WebServer/tenon/ssl/certs folder in a file named xx.xx.xx.xx.crt (where < xx.xx.xx.xx > is the IP address of the virtual host for which the certificate was generated). This file should be replaced by the real certificate when one is returned from the Certificate Authority.
The self-signed certificate will allow your virtual server to perform secure transactions while your official certificate is being processed.
 Browsers will question the validity of any server certificate signed by an authority of which they have no knowledge. The temporary, self-signed certificates should in no way be construed as proof of the virtual host's identity to your browser clients.
In some cases such as in a corporate intranet, a temporary self signed certificate is all that is necessary. See See Self-Signed Certificates for more about these.
Enabling SSL
Once you have a certificate (even an iTools-generated temporary one), you will be able to create a secure virtual host by toggling SSL Security "On" in the Virtual Host Configuration table. When SSL is activated for a virtual host, a red SSL designation appears to the right of the host name in the Virtual Hosts Table (see See Enabling SSL).
 If iTools's SSL option is not installed, the SSL Security "On" and "Off" buttons will not be displayed. The message "Not Installed" will be displayed instead.

Ciphers
While the SSL 3.0 standard defines how encryption is applied to Web server-browser interactions, the actual encryption itself is performed by the negotiated cipher. Some common ciphers supported by iTools are shown in the following table:
SSL Cipher Restrictions
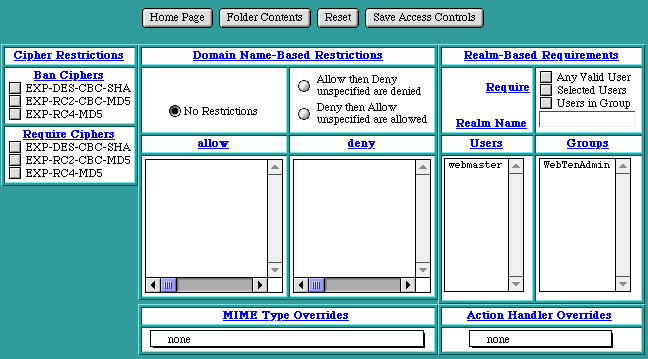
Clicking on the Folder Contents of a secure virtual host in the Virtual Host Configuration table will let you stipulate various cipher restrictions for that virtual host.
SSL Cipher Restrictions control whether or not access is allowed or denied to folders or files based on the encryption level negotiated between server and browser when an SSL connection is established. These controls are only accessible when SSLSecurity is enabled for a particular virtual host. The SSL cipher restrictions are not show if SSLSecurity is not enabled. Access control checks by SSL cipher are made in addition to any other host or realm-based access controls.
SSL cipher restrictions contain two lists of check boxes for each cipher in the cipher suites. If any checkbox is checked, that cipher is banned or required as indicated by the particular category.

Ban Cipher
If the cipher currently in force on the SSL connection is checked in this list, access to the file or folder is not permitted.
Require Cipher
If the cipher currently in force on the SSL connection has not been banned and is checked in this list, access to the file or folder is permitted. Ciphers not checked in this list are automatically banned access. However, if no ciphers are required, access is permitted subject to the SSLBanCipher list.
Using iTools with Multiple Certificates
Every SSL connection requires a unique IP address. Because iTools supports IP-based virtual hosting, you can easily set up multiple secure IP-based virtual hosts. Each secure IP-based virtual host will need its own Certificate.
Virtual Hosts with Both Secure and Un-Secure Service
iTools supports virtual hosts with both secure and normal (not secure) service. This configuration is represented in the Virtual Hosts Table by two entries with the same virtual host name. One entry will have the SSL designation, and one will not.
To create a virtual host with both secure and normal service, first create the virtual host (if it is not already created) and follow the instructions to make this virtual host secure. Next, create a new virtual host using the same name. The second virtual host is created without SSL enabled. Both virtual hosts will initially share the same DocumentRoot. Either virtual host can be moved to a new DocumentRoot if this shared configuration is not desired.
Safeguarding SSL Keys and Certificates
Each SSL Certificate works in conjunction with the SSL Key file that was produced during the creation of the Certificate Signing Request. SSL Certificates do not stand alone. They require the SSL Key file to perform encryption. SSL Certificates will only work with the corresponding SSL Key file that was used to produce the actual Certificate Signing Request.
The SSL Key file is your private key that ensures that no one can replicate or assume your site's identity on the Web. If the SSL Key file is compromised, the inherent security of your SSL Certificate is lost. If the SSL Key file is lost, the SSL Certificate is useless and a new certificate will have to be issued.
As you can see, it is important to preserve a copy of your SSL Key file and to protect it against theft. In iTools, the SSL Key file is tightly protected against unauthorized access (for example CGIs cannot read the SSL Key file). To backup the SSL Key file, see the instructions in "See D: iTools MaintenanceD: See Backup."
Self-Signed Certificates
If iTools is on an intranet and is not visible to the Internet at large, it can take advantage of SSL without having their certificate signed by a CA (Certificate Authority such as Thawte).To create your certificate, follow the directions in Section 11 of this document. That will yield a certificate signed by iTools. While this is not a certificate signed by a CA, it will allow SSL encrypted transactions from your iTools server. Some browsers will complain that the certificate is not signed by a valid authority (CA), but certificates for only internal or intranet use do not need to be validated by any CA (such as Thawte.)